Hack Your Ohio Garden: The Ultimate Guide to Indoor Seed Starting
Dreaming of vibrant blooms and overflowing vegetable patches? In Ohio, where the growing season can feel fleeting, getting a head start is key. Indoor seed starting offers a powerful advantage, allowing you to nurture tender seedlings before the last frost kisses the ground. But navigating the world of indoor sowing can feel like a daunting task. When exactly should you start those seeds? This guide unveils the secrets to successful indoor seed starting in the Buckeye State, providing you with the knowledge and tools to transform your gardening aspirations into reality.
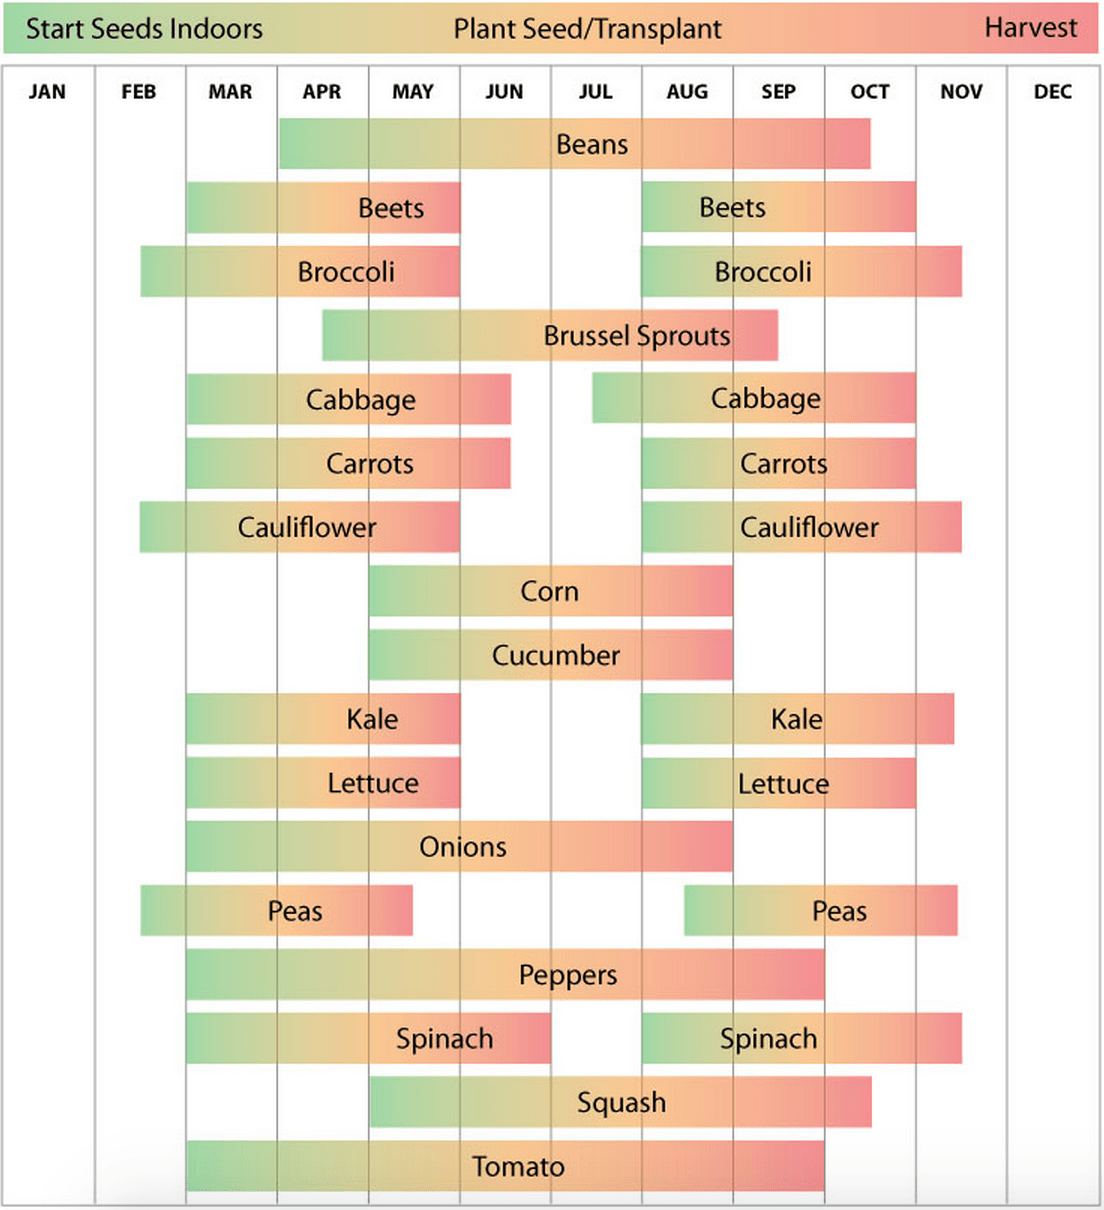
Starting seeds indoors in Ohio is all about timing. The state's variable climate and unpredictable spring weather mean you need to strategically plan your indoor sowing schedule. Sowing too early can result in leggy, weak seedlings, while starting too late might delay your harvest. This careful orchestration of timing allows you to maximize the relatively short growing season, extending it on both ends and giving your plants a robust foundation for flourishing in the Ohio outdoors.
The practice of starting seeds indoors likely originated with the development of agriculture itself, as humans sought to control and optimize their food production. In Ohio, with its distinct seasons, indoor seed starting became a crucial technique for gardeners wanting to extend the growing period and ensure a successful harvest. Historically, this involved simple methods like using windowsills for sunlight and repurposing household containers. Today, technology has provided us with specialized grow lights, seed starting mixes, and heating mats, allowing for greater control and success.
The primary issue with indoor seed starting in Ohio revolves around accurately determining the last frost date. This date varies across different regions of the state and can fluctuate from year to year. Incorrectly estimating the last frost can lead to premature planting and the loss of seedlings to unexpected cold snaps. Additionally, providing adequate light and maintaining consistent moisture levels indoors can also present challenges.
To determine the ideal indoor sowing time for a specific plant, calculate back from the estimated last frost date in your area. Seed packets often provide information on the number of weeks required for seedlings to mature enough for transplanting. For example, if a tomato variety needs six weeks and your last frost is typically around mid-May, you should start your tomato seeds indoors around early April.
Benefit 1: Extended Growing Season - Starting seeds indoors extends your growing season, allowing you to harvest earlier and enjoy fresh produce for a longer period. For example, heat-loving crops like peppers and tomatoes can be started indoors well before the last frost, giving them a head start and ensuring a fruitful harvest.
Benefit 2: Stronger, Healthier Plants - Indoor seed starting provides a controlled environment, protecting young seedlings from harsh weather conditions and pests. This results in stronger, healthier plants that are better equipped to thrive once transplanted outdoors.
Benefit 3: Cost Savings - Growing your own plants from seed is significantly more economical than purchasing established seedlings from nurseries, saving you money in the long run.
Action Plan: 1. Determine your last frost date. 2. Choose your seeds. 3. Gather supplies (seed starting mix, containers, grow lights). 4. Sow seeds according to packet instructions. 5. Provide adequate light, water, and warmth. 6. Harden off seedlings before transplanting outdoors.
Checklist: Seed starting mix, containers, grow lights, seeds, labels, watering can, heating mat (optional), fan (optional).
Step-by-step guide: 1. Fill containers with seed starting mix. 2. Sow seeds at the recommended depth. 3. Water gently. 4. Place containers under grow lights. 5. Maintain consistent moisture and temperature. 6. Harden off seedlings before transplanting.
Recommended Websites: Ohio State University Extension, The Old Farmer's Almanac.
Advantages and Disadvantages of Indoor Seed Starting
| Advantages | Disadvantages |
|---|---|
| Extended growing season | Requires initial investment in supplies |
| Stronger, healthier plants | Can be time-consuming |
| Cost savings | Requires space and proper lighting |
Best Practices: 1. Use sterile seed starting mix. 2. Provide adequate light. 3. Maintain consistent moisture. 4. Harden off seedlings gradually. 5. Monitor for pests and diseases.
Real Examples: Tomatoes, peppers, cucumbers, basil, flowers.
Challenges and Solutions: Leggy seedlings (provide more light), damping-off (ensure good air circulation), inconsistent germination (check seed viability), pests (introduce beneficial insects), insufficient light (use grow lights).
FAQ: When should I start my seeds? What kind of light do I need? How often should I water? What is hardening off? What is damping-off? What if my seeds don’t germinate? What kind of soil should I use? When can I transplant my seedlings?
Tips and Tricks: Use bottom watering to prevent damping-off. Use a fan to strengthen seedlings. Label your containers. Start with easy-to-grow seeds.
Mastering the art of indoor seed starting empowers Ohio gardeners to overcome the limitations of a shorter growing season and cultivate a thriving, productive garden. From vibrant flowers to bountiful vegetables, the ability to nurture plants from tiny seeds brings a deep sense of satisfaction. By understanding the specific needs of your chosen plants and implementing the strategies outlined in this guide, you can confidently embark on your indoor seed starting journey and unlock the full potential of your Ohio garden. Don’t wait for the perfect weather; create your own perfect growing conditions and reap the rewards of a flourishing garden bursting with life and color. Take the first step today and discover the magic of indoor seed starting.
Decoding wheat allergies whats the culprit
Double take the rise of the ryan reynolds look alike actor
Taming the beast conquer your marine exhaust with stainless steel elbows


